Core Tutorials
Examples
Advanced
Editing and Manipulating Text Files
Editing and manipulating text files from a terminal is a typical task. You may find that with practice, using the terminal to edit text files is far easier and more powerful than using a GUI text editor.
What we often call a “terminal” is in fact a terminal emulator. The first terminals, before the advent of video displays, were actually teletypewriters (abreviated tty). Text editing is quite literally what they were designed for. Click here to see how far we’ve come since the 60’s.
Find What You’re Looking For
There are several useful commands that exist for finding a desired file.
The Command find
The command find searches the filesystem for files based on their metadata.
The metadata that can be used to search for files includes, but is not limited
to a file’s:
- Filename
- Filetype
- Size
- Creation Date
- Access Date
- Modification Date
- Executables
- Permission Mode
Unlike search mechanisms found outside a terminal (like Window Search or Apple’s
Spotlight) which only list the files found, find can do things to the files it
finds. The tasks you can have find do are limited only by your imagination.
The syntax for find is:
find [-H] [-L] [-P] [-D debugopts] [-Olevel] [path...] [expression]
but the key to using find is in the path and expression arguments, which can be
complex. Details on how to use find and construct an expression can be found
in the find tutorial.
Examples
Print all regular files named exactly “.bashrc” within and below ~:
$ find ~ -type f -name .bashrc
Print all regular files ending in “rc” within ~ and below:
$ find ~ -type f -name "*rc"
Print all files (regular and directories) ending in “rc” within ~:
$ find ~ -name "*rc"
Print only directories one level into /etc that are 3 characters
long which end with “sh” or “sl”
$ find /etc -maxdepth 1 -type d -name "?s[hl]"
Find all files in ~ ending with “.jpg” or “.png” in any case that were created
within the last 2 days.
$ find ~ -type f \( -iname "*.jpg" -or -iname "*.png" \) -and -ctime -2
Find all the files strictly in /tmp named “data_NN.dat” where NN runs from
00-99 and run the command ls -l FILE on each of them:
$ find /tmp -maxdepth 1 -type f -iname "data_[0-9][0-9].dat" -execdir ls -l {} \;
Have you ever needed to analyze hundreds of data files? Imagine if instead of
calling ls on these files, you called a program that you wrote to analyze that
data. This is a quick way to generate those hundreds of plots you need to
process from your research data.
The Command grep
Sometimes what you’re looking for is inside a file. We can use the command
grep to find lines in a file or set of files that match a given pattern. This
is no ordinary document search. grep allows the use of regular expressions to
match against complicated patterns (the name is short for globally search a
regular expression and print). The basic syntax is
grep [OPTIONS] PATTERN [FILE...]
grep searchs all given FILEs for the given PATTERN. The pattern type and
output can be customized through various options. If no file is given, grep
will search standard input.
grep expects a regex. As said before, the details of writing a regular
expression are beyond the scope of this tutorial, but we’ll show you some
examples of how to use grep and the power of regular expressions anyway:
Find all lines containing the word ‘alias’ in ~/.bashrc:
$ grep alias ~/.bashrc
Find all the lines containing ‘apple’ in the unix dictionary file:
$ grep apple /usr/share/dict/words
Use a regex to find all lines containing ‘apple’ when ‘apple’ doesn’t start or end a word:
$ grep -E "[a-z]+apple[a-z]+" /usr/share/dict/words
Find all the words starting with ‘zo’ and ending in ‘ing’ as long as they do not end in ‘zing’ or ‘sing’:
$ grep -E "^zo.*[^zs]ing$" /usr/share/dict/words
Find all the words starting with ‘zo’ and ending in either ‘zing’ or ‘sing’:
$ grep -E "^zo.*[zs]ing$" /usr/share/dict/words
Find all lines that start with ‘class’ preceeded by any amount of whitespace in each file in the Python library directory.
$ grep -A 4 -d skip -E "^\s*class" /usr/lib/python2.7/site-packages/*
Find the declarations of all the Python functions in all the Python files in the Python library directory that take exactly three arguments that are not cast into tuples and show their line numbers.
$ grep -n -d skip -E "^\s*def\s[a-zA-Z]*\(([^\(\),]*,){2}[^\(\),]*\)" /usr/lib/python2.7/site-packages/*
Good luck trying to search for something that specific in Windows. Just imagine if your text editor could do find and replace operations using regular expressions…
There are a number of options that can be used with grep to find exactly what
you are looking for. A few of the most useful ones include:
-m NUM--max-count=NUM- Stop reading a file after NUM matches.
-n--line-number- Prefix the line number where the match occurs in the output.
-A NUM- “After context”. Print NUM lines following a match. Useful if you are looking for an unknown expression near a known expression.
-B NUM- “Before context”. Print NUM lines preceeding a match.
-C NUM- “Context”. Print NUM lines both preceeding and following a match.
-d ACTION- Directory action. Controls how
grepbehaves when it encounters a directory. Default is ‘read’, but can be ‘skip’ or ‘recurse’ as well.
Reading Files
The Commands head, tail and cat
The command head prints the first 10 lines of each file passed to it to
standard output. The option -n NUM can be used to show NUM lines instead of 10.
$ head /etc/passwd
The command tail prints the last 10 lines of a file to standard output. Like
head, you can pass the option -n NUM to change the number of lines printed.
$ tail /etc/passwd
The -f switch will continue to print output as the file grows. This is useful
for watching log files to test and debug programs.
The command cat (short for concatenate) will concatenate all files passed to
it and print them to standard output. This is useful for reading small files by
themselves. The real use of cat is to combine files, especially when used with
stream redirection and pipes, both of which we’ll talk about later.
$ cat /etc/passwd /etc/group
Pagers and less
The best way to actually read a text file in the terminal is to use a pager.
A pager allows one to view and move through a text stream ‘one page at a time’.
One of the earliest pagers was a program called more that allowed a user to
step forward (and only forward) through a long stream of text lines. This
limitation makes using more to read through a text stream cumbersome. Thus
more has been largely supplanted by a program called less for paging in
terminals. less is the default pager on most systems.
The authors of GNU software often have terrible senses of humor. In this case
naming the program less because less is ‘more’ while more is ‘less’.
If you’ve looked at a man page, the output was probably dumped into less,
which takes up the whole terminal screen.
We can load a document into less by calling:
$ less FILE
You can scroll text in less using the Up and Down keys.
However, you can also scroll up and down using k and j
respectively.
You’ll notice that k and j are the keys the most powerful
fingers of your right hand rest on when your hands are in the touch-typing home
row. This is a common theme in many programs and stems from a program which
we’ll talk about in a moment called vi.
There are many keyboard short-cuts in less. Some of the most useful are:
- q
- Quits
lessand returns you to the terminal prompt. - g
- Goes to the top of the document, or, if a number N is typed before pressing g, goes to the Nth line of the document.
- G
- Go to the end of the document.
- Space
- Scrolls down one page at a time.
- m
- When m is pressed and followed by any lowercase letter, the current position in the document is bookmarked to that letter name.
- '
- A single quote followed by a lowercase letter returns the view bookmarked with that letter.
- /EXPR
- ?EXPR
- Searchs forward or backward through the document for text matching the regular expression EXPR. If a match is found, the pager jumps to the matching text.
- n
- N
- Repeats the previous search, jumping to the next search match. N repeats the search in reverse direction.
Editing Files
Editing text is done properly using a dedicated text editor. There are many available for use in a terminal, and we’ll look at the basics of the most commonly available.
Nano
The default terminal text editor on Ubuntu-based flavors of GNU/Linux is a
program called nano (a
recursive acronym
for “nano is another editor).
Nano is easy to learn and simple to use. Nano is good for those who are new to terminal text editors because of both its simplicity as well as its on-screen help mode which is enabled by default and gives hints about how to use it.
Nano is invoked by calling:
$ nano [OPTIONS] [[+LINE,COLUMN] FILE]...
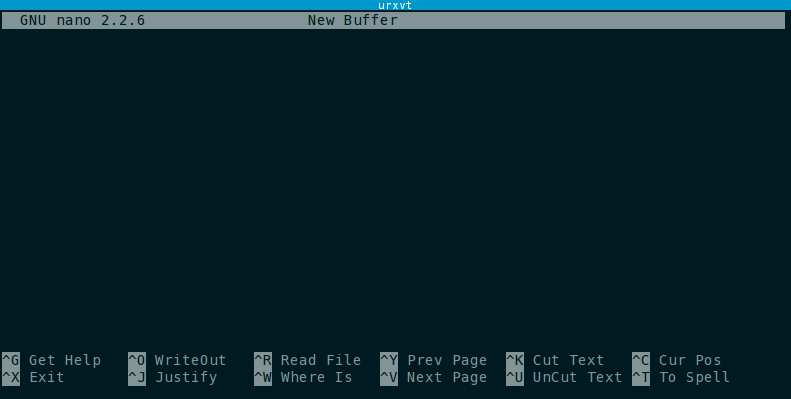
At the bottom of the program are the help mode hints. The symbol ^ indicates
the Ctrl key. So pressing Ctrl g
will bring up an on-screen help menu. Keyboard shortcuts with M- indicate the
‘meta’ key which is typically Alt.
- Ctrl G
- Display the help text
- Ctrl X
- Close the current file buffer / Exit from nano
- Ctrl O
- Write the current file to disk
- Ctrl J
- Justify the current paragraph
- Ctrl W
- Search for a string or a regular expression
- Ctrl Y
- Go to previous screen
- Ctrl V
- Go to next screen
- Ctrl K
- Cut the current line and store it in the cutbuffer
- Ctrl U
- Uncut from the cutbuffer into the current line
- Ctrl C
- Display the position of the cursor
- Ctrl T
- Invoke the spell checker, if available
- Alt \
- Go to the first line of the file
- Alt /
- Go to the last line of the file
- Ctrl \_
- Go to line and column number
- Ctrl \\
- Replace a string or a regular expression
- Ctrl ^
- Mark text at the cursor position
- Alt W
- Repeat last search
- Alt ^
- Copy the current line and store it in the cutbuffer
- Alt }
- Indent the current line
- Alt {
- Unindent the current line
- Ctrl Space
- Go forward one word
- Alt Space
- Go back one word
Lines that are longer than the width of the terminal are, by default, allowed to
go off the screen. When this happens, a $ symbol is shown at the edge of the
line where it continues off-screen.
Nano has a soft-wrap mode that will wrap lines on screen, but not put hard carraige returns in the lines. It also has a hard-wrap mode where long lines will be broken up into new lines. Be careful about which wrapping mode you are in, especially when editing programs, scripts, and configuration files.
Nano is a safe choice for quickly editing a file in a terminal, but its simplicity and heavy use of Ctrl in editing operations makes it hard to use for any serious writing, especially programming. A better alternative is to use a more fully featured editor with a more comfortable interface. If you are working with files on a local machine, then a GUI-based text editor like Sublime Text, Gedit, Textmate, Kate, Notepad++ may be a better choice.
If you must do lots of serious editing in a terminal (for example, you do a lot of work on a remote cluster on the other side of the world where your experiment resides over a crummy trans-pacific network connection), then it may be worth the time investment to learn to use an adept terminal-mode editor like ViM.
Vi and ViM
ViM is a super-powerful terminal-friendly extensible modal text editor.
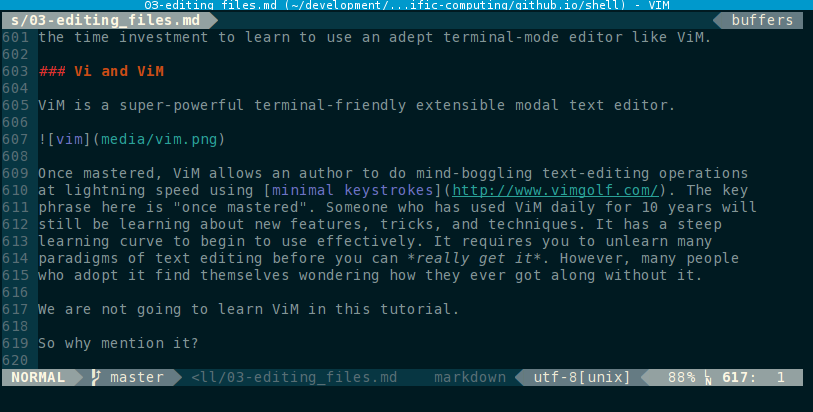
Once mastered, ViM allows an author to do mind-boggling text-editing operations at lightning speed using minimal keystrokes. The key phrase here is “once mastered”. Someone who has used ViM daily for 10 years will still be learning about new features, tricks, and techniques. It has a steep learning curve to begin to use effectively. It requires you to unlearn many paradigms of text editing before you can really get it. However, many people who adopt it find themselves wondering how they ever got along without it.
We are not going to learn ViM in this tutorial.
So why mention it?
Long, long ago in the before-time, there was ed, the editor. But ed was
awful and was replaced by ex, the extended editor. And then CRT monitors
replaced teletypewriters, and ex was given a visual mode which came to be
called vi. vi lives on today as the de facto standard Unix editor and is
available on virtually all Unix-like systems. However, vi is an extremely
minimal editor. Yet the nature of how it works is very appealing so it was
improved into a full-featured editor vim or the “vi improved” editor.
vim adds a great many features beyond what vi was originally designed
for.
As you spend more and more time working in a terminal, and because of the long
historical relationship between vi and Unix, there is a good chance that you
may one day find yourself suddenly in a vi session. When that happens, if you
have not been exposed to vi, nothing will quell your panic.
You press the keys with no effect,
Your mode is not correct.
The screen blurs, your fingers shake;
You forgot to press escape.
Can’t insert, can’t delete,
Cursor keys won’t repeat.
You try to quit, but can’t leave,
An extra “bang” is all you need.
– Chuck Musciano, Addicted To vi
vi and it’s younger cousin vim are modal editors. These editors can be put
into a number of modes within which keypresses do specific actions. The two
most important modes are normal mode and insert mode. Upon startup vi
and vim will be in normal mode. Here, the keys h, j,
k, and l can be used to move the cursor left, down, up,
and right respectively. Essentially every key does something in normal mode.
Key combinations do even more things.
One must be careful about hitting random keys in vi/vim’s normal mode. For
instance the key sequence ggdG will appear to erase the whole
document. It does the same thing as Ctrl-a
Ctrl-v would in a GUI text editor.
Pressing u in normal mode will undo the last change. vim keeps a
lengthy default undo history.
vi keeps only one operation in its undo history. Don’t mess up!
To actually enter text, you need to switch modes to insert mode. This can be done many ways. From normal mode, you can start editing text in insert mody by pressing:
- i
- To insert text where the cursor cursor currently is. This is the ordinary way to enter insert mode.
- a
- Enter insert mode to append text immediately after the cursor.
- I
- Enter insert mode to insert text at the beginning of the current line
- A
- Enter insert mode to append text at the end of the line
- o
- To open a new line below the cursor and insert text there.
- …
- So on and so forth
There are thousands of keybindings that do specific things. When you learn to use them, you can edit text faster and easier than you ever have before but you can see how these editors are not for the faint of heart.
Pressing Esc will return you from insert mode back to normal mode. In
normal mode, you can also issue commands to the editor from a command line mode.
To enter command mode, press :. Once in command mode, a : appears
at the bottom of the editor. Typing will write out the command after the : and
pressing Enter will issue the command.
The commands you need to know are:
:q- Quits the editor. If there are unsaved changes and
you wish to quit without saving, you must issue the command
:q!. :w- Saves (writes) any changes to the file. If creating a new document with no
file yet, you must issue the command
:w FILENAME.
Commands can be chained together. For instance, the command :wq will save the
file and then quit the editor.
This is the bare minimum you need to know if you ever find yourself
spontaneously in a vi session editing some crucial file.
For the record, this entire tutorial page was written in ViM, which is by far the author’s favorite editor for everything between plain text and programming. It takes a few weeks of learning to become modestly proficient and a few years to master, but if you spend much of your day writing documents or code, the effort put into learning ViM is absolutely worth it. Oh, and it does find-and-replace operations using regular expressions.