Core Tutorials
Examples
Advanced
Basic Shell Commands
Upon firing up a terminal emulator, it will start some flavor of text command-line-interface (cli) called a shell. There are many different shells available including but not limited to:
- bash
- the Bourne-again shell
- zsh
- Zhong Shao shell
- sh
- the original Bourne shell
- csh
- the C-shell
- tcsh
- the TENEX-csh
- ksh
- the Korn shell
- fish
- the friendly interactive shell
- …
- ad nauseum
On most systems, including Linux and modern MacOS, the default shell will be bash. Some older Unix and Mac systems will use (t)csh by default. Unless specifically stated we will assume the use of bash, although many shells are so similar that there is little functional difference for the casual user. Bash is arguably the best and certainly the most popular shell although some newer shells like zsh and fish are making their way onto systems by default.
The Prompt
The shell presents itself as a prompt. The appearance of the prompt can be
customized and often is different from system to system even if they are running
the same shell. It is common, however, to have the last character in the prompt
be $.
$
From the prompt, we can issue commands to do virtually anything we wish a computer to do. Every command is either a program, script or shell function. We issue a command by typing it in at the prompt and pressing Enter.
Most commands expect number of mandatory positional arguments which are typed after the command name, in order, and each separated by a Space. Most commands can also take a number of non-mandatory optional arguments or switches. Switches can dramatically alter what a command does. A switch is invoked by writing it’s name after a command. A command will have a general structure in the form:
$ commandname --long-switch-name switch_argument -m -a -n -y -SwtchZ arg1 arg2
All switch names start with a hyphen. One hyphen - is used if the switch has a single character name and two hyphens -- are used if the switch name is more than one character.
Arguments to a switch, when needed, follow the switch name. If a switch expects an argument, that is then written following the switch name separated by a Space.
Switches that do not take an argument can be grouped together after a single hyphen.
Every part of a command is Space separated. The command, all its arguments (both positional and optional) and any switches invoked after a command must each be separated by a Space.
Commands and arguments are case-sensitive. You will find that most commands and multi-character switches are all lowercase, while single character switches to be of any case. Some commands will have single character switches of the same name, but different case!
Ordinarily only one command is issued per line. To issue to commands on the same
line, they must be separated by ;
$ command1 arg1; command2 arg2
We’ll look at some examples using basic commands first.
Who and Where am I?
The command whoami will return the username you are currently logged in as:
$ whoami
prismo
The command will dump it’s response below the prompt and issue a new one.
Once you know who you are, it helps to know where you are. The shell keeps
track of where you are in the filesystem (much like a file manager). Many
commands that you issue need the location of files relative to where you
currently are. To find out what directory you are currently in, issue the
command pwd (short for ‘print working directory’):
$ pwd
/home/prismo
It is useful to know the hostname of the machine you are using, especially if
you are using a machine remotely through a terminal. We find this with the
command hostname:
$ hostname
timeroom
Many folks will modify their prompt to include all this information so they don’t lose track of who and where they are so some prompts may look like:
[prismo@timeroom: /home/prismo] $
but for brevity, examples here will use just $ and sometimes maybe # as the
shell prompt.
Getting Help
We’re going to learn a lot of commands. If you are new to this, relax: no one expects you to remember everything about working in a shell. It takes years of regular use to recall the syntax for all but the most used commands. The developers of all this stuff know this and have provided some help that you can access right from the prompt. This can be done two ways:
Most commands implement a switch named --help that will print a summary of a
command’s use and syntax without actually running the command. It looks like
this:
$ whoami --help
Usage: whoami [OPTION]...
Print the user name associated with the current effective user ID.
Same as id -un.

      --help     display this help and exit
      --version  output version information and exit

GNU coreutils online help: <http://www.gnu.org/software/coreutils/>
For complete documentation, run: info coreutils 'whoami invocation'
The other means of getting help in the terminal is by reading the command’s
manual page. To access the manual for a command, we invoke the command man.
The command man takes the name of the command you wish to see the manual for
as an argument. The manual page will appear in a terminal text-viewing program
called a pager.
$ man whoami
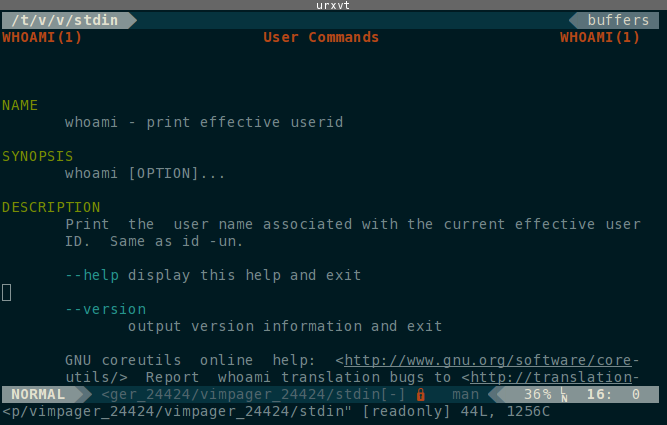
The manual pages tend to be complete and will tell you everything you could want
to know, but they can sometimes be daunting. To sort out all this mess,
you should take a moment to read man’s manual page:
$ man man
A manual page’s SYNOPSIS section is often all you really care about reading.
The following conventions apply to the SYNOPSIS section
and can be used as a guide in other sections.

bold text          type exactly as shown.
italic text        replace with appropriate argument.
[-abc]             any or all arguments within [ ] are optional.
-a|-b              options delimited by | cannot be used together.
argument ...       argument is repeatable.
[expression] ...   entire expression within [ ] is repeatable.

Exact rendering may vary depending on the output  device.   For  instance,
man will usually not be able to render italics when running in a terminal,
and will typically use underlined or coloured text instead.
Getting Around
The most used commands are the ones for moving yourself and files around the filesystem.
| Command | Mnemonic | Description |
|---|---|---|
ls |
list | Lists directory contents |
cd |
change directory | Change current working directory |
The Command ls
The contents of a directory can be listed by the ls command. The behavior of ls
can be greatly altered by the many switches available to it. The more useful
ones include:
-llong format showing more details-hprint file sizes in a more human-readable format-ashow all files, including hidden files-tsort by modification time-Ssort by file size.-Xalphabetically by extension--group-directories-firstsort directories before files
Here is what the output of ls looks like on a typical system:

Hidden files. On UNIX-like systems, files starting with a period . are considered ‘hidden’
and are not normally listed by ls.
The Command cd
To move between directories, we use the cd command, which takes the path
of the directory you wish to move to as an argument.
$ cd /home/prismo/pickle_recipes
Files and directories can be referred to by either their absolute path or their relative path with respect to where you currently are.
To understand paths, we must first explain how directories are structured in a UNIX-like system.
The UNIX Directory Tree
The UNIX standard outlines an order for where files should go. UNIX-like
operating systems like Linux and MacOS share much of this structure. The Windows
file tree however is very different. The UNIX directory tree starts at a
directory called ‘the root directory’ or ‘root’. The root directory is located
at / which is read as either ‘root’ or ‘slash’. Using ls, we can inspect
the contents of a typical root directory:
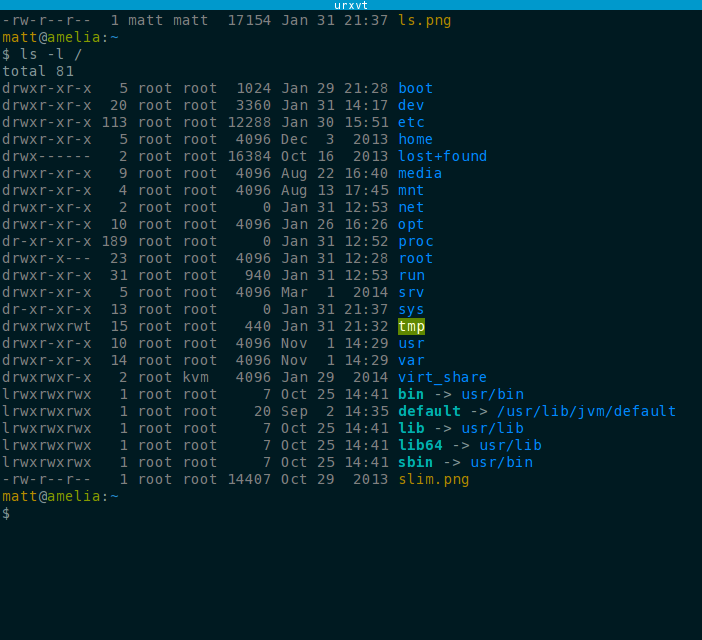
A typical UNIX filesystem will have the following directories and subdirectories:
| Path | Read As | Contains |
|---|---|---|
/ |
root | The root filesystem, highest directory in the system |
/boot |
… | bootloader |
/dev |
device | system device files |
/etc |
et-cetera, etsy | global system configuration files |
/home |
… | user’s personal directories |
/media |
… | mountpoints removable media |
/mnt |
mount | abstract temporarily mounted filesystems |
/opt |
optional | third-party software |
/proc |
process, prok | process/kernel virtual fs |
/root |
root-home | root user’s home directory |
/run |
… | ramdisk tmpfs for temporary OS runtime files |
/sys |
system, sys | system virtual fs |
/tmp |
temp, temporary | ramdisk tmpfs for general temporary files |
/usr |
user | userland applications |
/usr/bin |
user bin | system commands, applications, and binaries |
/usr/include |
user include | system programming header files |
/usr/lib |
user lib | system shared libraries |
/usr/local |
user local | same as /usr but for host-specific files/commands |
/usr/share |
user share | system shared resource files |
/var |
variable, var | runtime variable files |
For those coming from Windows, / is in some ways like C:\ except that it is
a bit more abstract. On Windows systems, C:\ is the root directory of a single
disk partition. On UNIX-like systems / is the root directory of everything,
and it not limited to a single disk partition. All other mounted filesystems
and disk partitions appear as subdirectories of /.
As a user, all of your personal files will reside in /home/username and this
is where you’ll spend most of your time. For users familiar with Windows, this
is like the C:\Users\username directory.
Most of the programs and executables on a UNIX system reside in the /usr/bin
(‘bin’ for ‘binary’ as in binary executable) directory.
Using cd
Absolute paths are always referenced from the root directory and will always
start with a / like this path to a directory ‘documents’ in the home directory
of the user ‘prismo’:
$ cd /home/prismo/documents
Regardless of what directory you are currently in, changing directory with an absolute path will take you where you wanted to go.
Writing out absolute paths is long and tiresome. Often we are already in a directory that is close to our intended destination. In this case, we can use a relative path with respect to our current working directory:
$ pwd
/home/prismo
$ cd documents
$ pwd
/home/prismo/documents
Every directory contains at least two special hidden directories:
.refers to the current working directory (cwd)..refers to the parent directory of the cwd.
We can use these to make relative paths up the directory tree:
$ pwd
/home/prismo/documents
$ cd ../science
$ pwd
/home/prismo/science
You will spend most of your time in your home directory, and so there are
special ways of refering to your home directory. The name ~ refers to the
absolute path of your home directory. Regardless of where you are in the
filesystem, you can do things like:
$ pwd
/var/log
$ cd ~/documents
$ pwd
/home/prismo/documents
In fact, ~ is an alias for something called the $HOME environment variable.
We’ll learn more about environment variables later.
If cd is given no arguments, it will return you to ~.
$ pwd
/var/log
$ cd
$ pwd
/home/prismo
Lastly, cd remembers the last working directory in an environment variable
$OLDPWD. When cd is called with a hyphen as it’s argument, it will change
directories to the last remembered working directory and print its name:
$ pwd
/home/prismo/documents
$ cd ../research/pickle_recipes
$ pwd
/home/prismo/research/pickle_recipes
$ cd -
~/documents
$ pwd
/home/prismo/documents
So to summarize the special directory names:
| Name | Location |
|---|---|
. |
current working directory |
.. |
parent of cwd |
~ |
user home directory |
- |
last working directory |
Manipulating Files
The following table of commands consists of those used for creating, moving, and destroying (deleting) files and directories.
| Command | Syntax | Description |
|---|---|---|
mkdir |
mkdir [OPT]... DIRECTORY... |
Makes a new directory at path DIRECTORY |
mv |
mv [OPT]... SRC DEST |
Moves (renames) file at path SRC to path DEST |
mv [OPT]... SRC... DIR |
Moves all SRCs into directory DIR | |
mv [OPT]... -t DIR SRC... |
Moves all SRCs into directory DIR | |
cp |
cp [OPT]... SRC DEST |
Copies SRC to a new location DEST |
cp [OPT]... SRC... DIR |
Copies all SRCs into directory DIR | |
cp [OPT]... -t DIR SRC... |
Copies all SRCs into directory DIR | |
rm |
rm [OPT]... FILE |
Deletes FILE from the filesystem |
rm [OPT]... -r DIR |
Deletes directory DIR and their contents recursively | |
touch |
touch [OPT]... FILE... |
Touches the filesystem, creating empty FILEs |
rmdir |
rmdir DIR... |
Removes empty DIRs from the filesystem |
The syntax for the above commands are taken directly from their manual pages. Each syntax should be written on a single line!
There is a command rename but it does not work the way you think. The ordinary
way to rename a file is to move it into it’s new name using mv.
The commands rm and rmdir will not remove a non-empty directory. To do that,
you must use rm’s ‘force’ and ‘recursive’ switches rm -rf PATH.
Commands to delete a file cannot be undone! There is no ‘recycle bin’ when using shell commands.
A Note On Filenames
Filenames can be between 1 and 255 characters in length and use any 8-bit
character except / which denotes directory separation.
It is most convenient to use only the characters A-Z,a-z,0-9,.,_, and
- whenever possible. This is because shells interperet many symbols as
instructions. For instance, we’ve already seen that the shell looks for
;as a command separator- sequences starting with
-as command switches ~as your home directory.
Shells generally treat characters in the set
`!@#$%&*()+=[]{}|\;‘“<>/?
as special characters. To use any of these in a filename, the character must be
escaped or marked in a way that the shell knows it is not to treat it as a
shell instruction. To escape a character, you put a \ in front of it. So to
use a file named Research Paper - first draft (prl).pdf in a command,
you would need to escape all the parentheses and Spaces:
$ touch Research\ Paper\ -\ first\ draft\ \(prl\).pdf
Of course no one wants to type that out. So you can alternatively wrap the filename in quotations: the shell will know the characters in the name are not to be interpereted as shell functions:
$ touch "Research Paper - first draft (prl).pdf"
The need to escape special characters in filenames applies to all functions.
Not escaping the characters would cause a number of errors:
touch would try to make files named Research, Paper, first, draft and
update the timestamp on the last working directory -, but ultimately fail when
it encounters the parentheses.
A better practice for naming files is to use shell-safe names that do not
require escaping like research_paper-prl_draft_01.pdf whenever possible, even
when using a graphical user interface (GUI) as such a name has almost universal
cross-compatibility between systems.
Even though the character - is considered shell-safe, it can cause problems
especially if it is the first character in the filename because the shell will
think it is a switch. To access a file named like this, we must write out the
file’s path:
$ mv -bad_name better_name
mv: invalid option -- 'a'
Try 'mv --help' for more information.
$ mv ./-bad_name better_name
Never start a filename with -. Doing so will only lead to heartbreak.
File Permissions
Unix-like systems are multi-user environments. As such, they attach attributes, called permissions, to every file (including directories) that control access to that file.
There are three types of access to a file. Read (r) access allows a file to be read; write (r) access allows a file to be created, modified, or deleted; and execute (x) access allows a program to be run or a directory to be entered.
On top of this, there are three levels of permission granularity controlling who has these permissions. Permissions can be granted to to the file’s owning user (u), to members of a file’s group (g), or to everyone else or others (o).
We can inpect what permissions a file has by looking at the long-form output of
ls -l:
$ ls -l
total 0
drwxr-x--- 2 prismo cosmowl     40 Feb  2 01:26 limited
drwx------ 2 prismo prismo      40 Feb  2 01:26 private
drwxr-xr-x 2 jake   finn        40 Feb  2 01:26 public
drwxrwxrwx 2 prismo ooo         40 Feb  2 01:27 reckless
-rw------- 1 pepbut pepbut       0 Feb  2 01:32 confidential
-rw-r--r-- 1 peeble peeble       0 Feb  2 01:26 default
-rw-rw-r-- 1 peeble royalty      0 Feb  2 01:31 group_edit
-rwxrwxrwx 1 lich   lich         0 Feb  2 01:38 insane
-rwxr-xr-x 1 root   root         0 Feb  2 01:30 program
-rwx------ 1 randy  bnubs        0 Feb  2 01:30 secret_script
The first column shows the file’s permissions as a string of characters.
In order from left to right, the characters indicate:
- File is a directory (d), symbolic link (l), or neither (-)
- Owning user has read access (r) or not (-)
- Owning user has write access (w) or not (-)
- Owning user has execute access (x) or not (-)
- Group members have read access (r) or not (-)
- Group members have write access (w) or not (-)
- Group members have execute access (x) or not (-)
- Others have read access (r) or not (-)
- Others have write access (w) or not (-)
- Others have execute access (x) or not (-)
The second column indicates the number of links that point to the file.
Directories always have at least 2 (its name in its parent directory and .
within it) while files have at least one.
The third column is the owning user’s name.
The fourth column is the file’s group name.
The fifth column is the filesize (default in bytes).
The sixth column is the month, day, time/year that the file was last modified.
The seventh column is the filename.
To see what groups your username is a member of, use the groups command. If
you are in the same group as a file, then the file’s group permissions are
granted to you.
Permissions are additive. Everyone is granted others permissions. All members of a file’s group are granted group permissions. The owning user is granted user permissions. If you have some permissions from each category, they all will apply to you.
Changing File Permissions
We can modify the permissions of a file with the command chmod (short for ‘change mode
bits’). The syntax is
$ chmod MODE FILE
where MODE is either a symbolic modifer string or an octal number representing the desired bit mode. The symbolic representation is easier to use for beginners. From the man page:
The format of a symbolic mode is [ugoa...][[-+=][perms...]...],
where perms is either zero or more letters from the set rwxXst,
or a single letter from the set ugo.
The set ugoa corresponds to user, group, others, and all. The operators -+=
remove, add, or set exactly the permissons that follow. The set of perms
rwxXst correspond to read (r), write (w), execute (x), and three other modes.
(X) sets the execute (x) bit only if the file is a directory or an (x) bit is
already set, (s) sets the set uid/gid bit, and (t) sets the “sticky bit” that
restricts deletion. The last two (s) and (t) are uncommon for most casual uses.
Multiple symbolic modes, separated by commas, can be passed at the same time.
So for example to add the read and write permissions for the owning user and group of a file, while removing everything from others, we write:
$ chmod ug+rw,o-wrx file
When sharing files with others, or when writing programs, you must make sure the permissions are set correctly. For instance, a common issue for beginners is to forget to set executable permissions on scripts.
Another thing to be careful about is ensuring sensitive files are private or restricted. For instance, any public-private cryptography keys you have must be kept secret and should have permissions ‘-rw——-‘ (they should be considered compromised if they are ever readable, even for a moment, by anyone other than the owning user). Likewise, progams usually should have write permissions only for the owning user otherwise the code could be modified by a malicious user.
In the example above, the directory ‘reckless’ and the program ‘insane’ have dangerous permissions and should be avoided unless you really know what you’re doing. The directory ‘public’, the file ‘default’, and the program ‘program’ have pretty typical settings for non-sensitive files. Lastly, ‘private’, ‘confidential’, and ‘secret_script’ have permissions that are typical for sensitive or secret files.
When used properly, UNIX permissions are a powerful management tool that keep systems secure.
Changing File Owner and Group
To change a file’s owner and group, use the command chown. The syntax for
chown is
chown [OPTION]... [OWNER][:[GROUP]] FILE...
chown [OPTION]... --reference=RFILE FILE...
You must have write permission to change file ownership.
Changing You Password
To change your login password, issue the command
$ passwd
passwd will prompt you for your current password and then your new password
twice. If something goes wrong in the process, your password will not be
changed. Normal users (ie, not superusers or adminstrators) can only change
their own passwords. In most cases, changing your password to a weak one will be
rejected and a reason given.